Hi folks, the semester is done and I managed to pass my classes. Math 65, the bane of my semester, ended with a D on my first test, an F on my second, and another F form my final. However I still managed to pull through the class with a C. I can live with that.
But this isn't what you're all here for. No you're all here to see what crazy idea it is that I got into my head this time. Now as a tabletop gamer I do more than just play, I also GM, and frankly I don't have a GM screen for everything. I have one for Star Wars (Fantasy Flight edition), but not one for anything else.
Well that just won't do, now will it?
 |
| The "Fancy" wooden GM screen...yes it is very nice. |
To that end I saw a video on YouTube about building your own GM screen from a couple of binders. Well I thought that was interesting...but I could certainly DIY this sucker as something better. Sure this is a little over the top, but if you're on a budget and don't want to fork out a bunch of money for a fancy wooden GM screen then maybe my little project can be of help for you.
So where do I begin with this project?
Well let's start with all of the things that you will need for this build.
SUPPLIES
- 2-3 solid plastic binders. Note that these cannot be the cardboard binders that have plastic covering over them. No you will need the fancier solid plastic (or vinyl, not sure what their made of) binders. Luckily for me, the places I work at tend to toss these suckers out, so their free game. You'll want big binders, as smaller binders just won't quite work for some of the later parts. (you'll see in the picture to follow).
(Click here for Binder example.)
- Dremel. Well you could work without it, but it's handy to have. You may want to use the dremel's cutter disk to chop down the metal parts to come, though if you have a pair of tin-snips then those might work too. Plus a grinder is helpful for after the metal cutting, and a sander is good for another step.
- Exacto Knife. You're going to use this for a few different things.
- 5cm thick piece of cedar wood. Ok, this may be an odd one, but this is for a dry-erase board I'll be making. It's something you can find in a hobby shop, you'll just need to cut it down to be around 8x11 inch.
- Magnets. You'll only really need about 3 of them.
- Push-pins: They serve a purpose.
- 1 or 2 sheets of foam board. I'm going to make a dice tower. Now you see why there are push-pins.
- Super Glue (gel). I would go with Gorilla glue for this, but any gel based super-glue will work.
- Contact Cement. It's important for at least a few things.
- Hammer & Flathead Screw Driver. You'll need this for just one task.
- Small Binder Clips. These will be handy to have.
- Clamps. Whether or not you'll need these is up to you. I have a small clamp that I've used to help hold some stuff together.
- Blue Painters Tape. It comes up easy and is good for some steps to hold things together or form a border.
- Brads. These may or may not have a purpose...I'm not so sure yet.
- Ruler. You may want a t-ruler, but a ruler in general will be needed.
STEP 1
Let's get started now. Take one of the big binders and open it up. See that 3-ring part in the binder, well that needs to come out. Cose it up and look on the binding for the two rivets that hold this in place. Use the hammer and flathead screwdriver to bash that sucker off. You should be able to do this without damaging the binder so long as you're careful and pay attention to what you're doing.


Now notice the wire cutters...you may or may not need those to help loosing up things to get the screwdriver in to knock out the rivets. You will then use the exacto knife to cut out the plastic sleeve on the left side of the inside of the binder (or right if that's your preference).
STEP 2

The next thing we need to do is work on our board. Take your wood board and cut it down to fit the inside of the binder so no parts stick out. Use a sanding block or your dremel to sand down the parts that need it where you cut. Use the sanding block (or just a sheet of sandpaper) to sand down the rest of the wood.
After you've spent some time doing this, pick a side to be the back. Now you will need to mark 3 points where you will be putting your magnets.
If you have a drill bit that you can use for these magnets to make them a bit recessed into the wood (but not going all the way through), then feel fee to use it. Otherwise you can always use your exacto knife, and a small drill bit, or chisel to carve out your spots.
Once your spots are carved out, get your glue and glue the magnets in. I'll get to the white board part later.


STEP 3
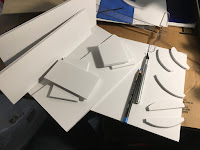
Time for metal cutting. My magnets need a something to attach to, but finding a thin, light, piece of metal that a magnet can attach to. Finding something that would work wasn't easy. In the end I found a metal ruler. I bought 2 of them and then used my dremel's cutter to cut the metal ruler. Now what I forgot to do, and advise you to do, is to remove any foam backing on the ruler if it has it. The heat from the dremel cutting the metal will cause the foam to loosen up in spots.
You will want to cut this close to the end (where the 12 is) of the ruler. This is especially important if the ruler has a hole at the end of it like mine does. Either way, once its cut, your going to want to sand down the edges where it was cut.
With the ruler cut we now need our longer part affixed to the top of the binder. But as I learned, this isn't going to be easy. To start lay the ruler down close to the top and use the painter's tape to outline the ruler.
What I did next from here was attempt to use my Gorrilla glue to afix the ruler to the binder.
Nope, it didn't work. So once you have the ruler outlined, use your exacto knife to make some striations in the blastic of the binder. NOW, if you have not gotten the contact cement - do it. Hot glue does not work with these binders. They still have some flexibility and hot glue, caulking and super glue just don't work with this. Contact cement works well, just follow the instructions and you should be fine.
 |
| Use contact cement, it works. |
Alternatively, get some "mounting tape". Its double sided with a foam separator for both sticky parts. You may want more than one clamp for doing this but, put the tape on the ruler, then peal off the back half and apply to the binder. Clamp it all down to help give the glue on the tape a chance to set.
Once it's all set, your board with the magnets on it can not be put in place.
STEP 4
Alright the next step now is to work on our foam board. We will be making a dice tower to affix inside the binder. With this step you could use plans from online, but you may have to adjust the patterns you find to fit the inside dimensions of the binder. To this end take measurements of the binder's backing. And measure this out on the foam board for the width. The height should stay within the confines of this as well. Now one last thing you want to trace out is the curve of the spine of the binder. For me, this was where I would be putting my dice tower, though you may to put yours someplace else.
Once you have your dimensions down. Use the t-ruler to draw out your dimensions on the foam board. Remember that spine. Well cut out the curve from that paper and make a template to put on the foam board. You're going to want to make a few of these as you will be attaching them to the binder and the dice tower. More than 1 of these will help to give stability once it's attached.
With everything traced out you will cut out your patterns with the exacto knife. With the back pieces for affixing it to the binder, I found that there are some nubs that you need to account for and file down on the foam board.
I used my clamp to hold all the pieces together and then applied my sanding block to the edges of the curved part of the foam board.
Now it's all about assembly. Push pins are your friend for holding it all together. Super glue binds it all. Start with the back, and a side. Some tape is all you need initially here, but pins work too. Once the glue sets just put your steps in at a slant so that your dice roll down easily and don't' get hung up. Now if you want to use a hot glue gun here you can, but its not the best option I feel. The better option I found was to use caulking as you can use a finger to ensure that cracks and corners get filled. It also does well for adhering things together.


The next step you need to do is to cut an opening for the front part of the tower that lines up with the bottom slope. Just be sure to leave room to glue your sides in place. With the inner workings setup you can start gluing it all together fully. As you can see, I used tape to help guide where my parts are supposed to be set. The side goes on first, applying glue (or caulking) to the slope sides. Then put glue (or caulking) to the back of the few slopes there, and bring up the back cover. For me, I only put the caulking on the slopes. for where each side touched, I used super glue.

Now remember those curved parts for the binder's back? Well I'm not ready to glue them on just yet. What I have learned here, is that contact cement will melt the foam in your foam board. Yeah it was a bit of a surprise. What your going to need to do is treat the foam first before we use the contact cement. Use some hot glue here to seal off the foam, or gel super glue. However you may want to first glue your curved parts to the back of your dice tower first. Attaching the parts is easy to do with push pins and super glue.
Once you get the parts on, now seal the exposed foam. After the glue has dried, you can use your contact cement to put it all together. First put a liberal amount of the stuff on the foam and then press it to the bonder. The purpose of this is to mark where the parts will touch. Add more contact cement to the binder where the spots touch. Let dry and you should be good. However if you messed up like I did. You may used gel super glue and some shavings of extra foam board to shore up the pits in the foam. Then go and do your attachment process again.
If you have any gaps you are going to need to use some more contact cement to fill in the gaps (as best you can) and just let it dry. And again, don't use hot glue, it just won't stick. Now once it all dries and is solidly in place you can paint it if you want to. I'm skipping this step at the moment just to get it all put together.
STEP 5
Ok, so now we can move on to additional steps. In this step we can put everything together, or we can add some extra stuff. I am adding a few odds and ends. For example, because I ensured that my dice tower wasn't a top-to-bottom fit, and thus left some space on the top, I can now mount an old cellphone holder I have onto the binder. No I miss judged one of the holes I drilled, but it still came together. I had originally mean for it to be able to move, but I abandoned this idea when it didn't work out too well.
The idea for the cellphone holder is simple. If I have music, or an app I want to use, I can easily look it up on my phone there. Plus it ensures that I know where my phone is.
Assembling doesn't need to be too tough. Just use binder clips. You could try and use contact cement to bind two parts together, but I don't recommend it. Alternatively, if you want to get a bit fancy. You can drill a a pair of holes at the end of one binder, then cut a line perpendicular to where those two holes are on another binder. They idea here is to make a track, so that you can slide the binder out and make the hole build longer. If you do this, you will want to use your a dremel.
One thing you may need to do (like I did) was pull the ring clip from inside another binder so that everything closes up nicely.
If you haven't done it yet, you'll need to put your dry erase paper onto the board. You will want to be sure to use an object to rub on the paper after it's been stuck on so that it will stay on the board a little better, and it will help get out any air bubbles. Besure you left enough extra on the sides that you can fold them over. You may want to use some superglue along the edges of everything to help hold things in place. And you will need to cut out spots so that the magnets on the back don't interfere with the paper.
-The Final Product-
Its taken me awhile to finish this out. I've added clips for a usb light, and I even got a cable to hook it to my laptop. Now the only problem I have is that the cable is 6ft long, and I may need to cut out a flap in the binder for cords to go through. I also got some GM screens printed off. The problem I ran into with that is they were in landscape format instead of portrait. And since my printer is dead, I'll have to wait until I get a new printer to print off something different. Now the sheets are on one side, and open to allow me to look at things, two pages at a time. My laptop has space, a spot for my cellphone, and a light incase where I'm set up doesn't have adequate light. (Which at my friends place, where we game, is the case. I also have limited space on this table at home for opening things up.)
Now this is just one method I came up with for building this. I do, infact, have another build idea for a GM screen as I happen to have a few extra binders laying around and awaiting cannibalization. So stay tuned for more on that build as it may be a while before I tuck into that.
Thanks everyone and enjoy your own builds.


